RibbonDiff is a side-by-side, editable diff tool for macOS. The current app includes the Pro-only Workspace, Workspace file search, and Version History workflows, so you can keep, search, and organize a project in a shared sidebar, jump between related comparisons without rebuilding context, and review Git-backed history snapshots directly inside the app. The editor still supports live diffing, per-pane Find, syntax highlighting, adjustable typography, and the familiar center Ribbon that links corresponding change blocks as you scroll.
👑 marks a Pro feature (available in Pro Trial or Pro Lifetime). Click the crown for details.
Contents
- 1. Quick start
- 2. Interface at a glance
- 3. Comparing text (how the diff is shown)
- 4. Workspace
- 5. Version History
- 6. Opening files and folders
- 7. Saving files and workspaces
- 8. When files change on disk
- 9. Unsaved changes behavior
- 10. Find (search) in either pane
- 11. Syntax highlighting
- 12. Toolbar, title bar, tab bar, wrap, and Ribbon width
- 13. Preferences and themes
- 14. Importing and exporting themes (advanced)
- 15. Keyboard shortcuts reference
- 16. Troubleshooting
- 17. Access levels (Limited and Pro)
1. Quick start
-
Start with text, files, or a Workspace
- Paste text into Text 1 (left / Original) and Text 2 (right / Modified), or
- Open files into the left and right panes from Finder, drag and drop, the menu bar, or Terminal 👑.
- Open a folder or an existing
.rd-workspacedocument in the Workspace sidebar to compare related files without leaving the same project context 👑. - Use Open Workspace… (
⇧⌘O) from the File menu to open the Workspace document picker in a new standalone window, or use the sidebar's Open Folder or Workspace File action to bind a workspace to the current window 👑.
-
Use Workspace for project-based review 👑
- Select a file in the Workspace sidebar to open it directly into the left side of the comparison.
- Option-click a file in the sidebar to open it in another tab in the same window.
- Use Find in Workspace… (
⇧⌘F) to search text across the open Workspace, jump directly to matching lines, or Option-click search results into another tab. - Use the sidebar action menu or a folder context menu to add files and folders, then finish the inline rename.
- Command-click or Shift-click to select multiple Workspace items for drag moves or confirmed Trash-backed delete.
- Click a file that is already open to switch straight to its existing tab.
-
Edit freely or inspect history
- Live panes are editable. Historical previews opened through Version History 👑 are read-only.
- Diff highlighting appears once both sides have content and updates automatically as you type, paste, open files, or switch history snapshots.
- When a comparison first becomes available, RibbonDiff automatically jumps to the first changed block (if any).
-
Navigate, review, and save
- Use the center Ribbon and the Next Change / Previous Change controls to move through large diffs quickly.
- Save the active pane when you are ready, or save a Workspace document so you can restore the same project tree and expansion state later 👑.
- If an opened file changes on disk, RibbonDiff now reloads it automatically, or asks before replacing unsaved in-app edits.
2. Interface at a glance
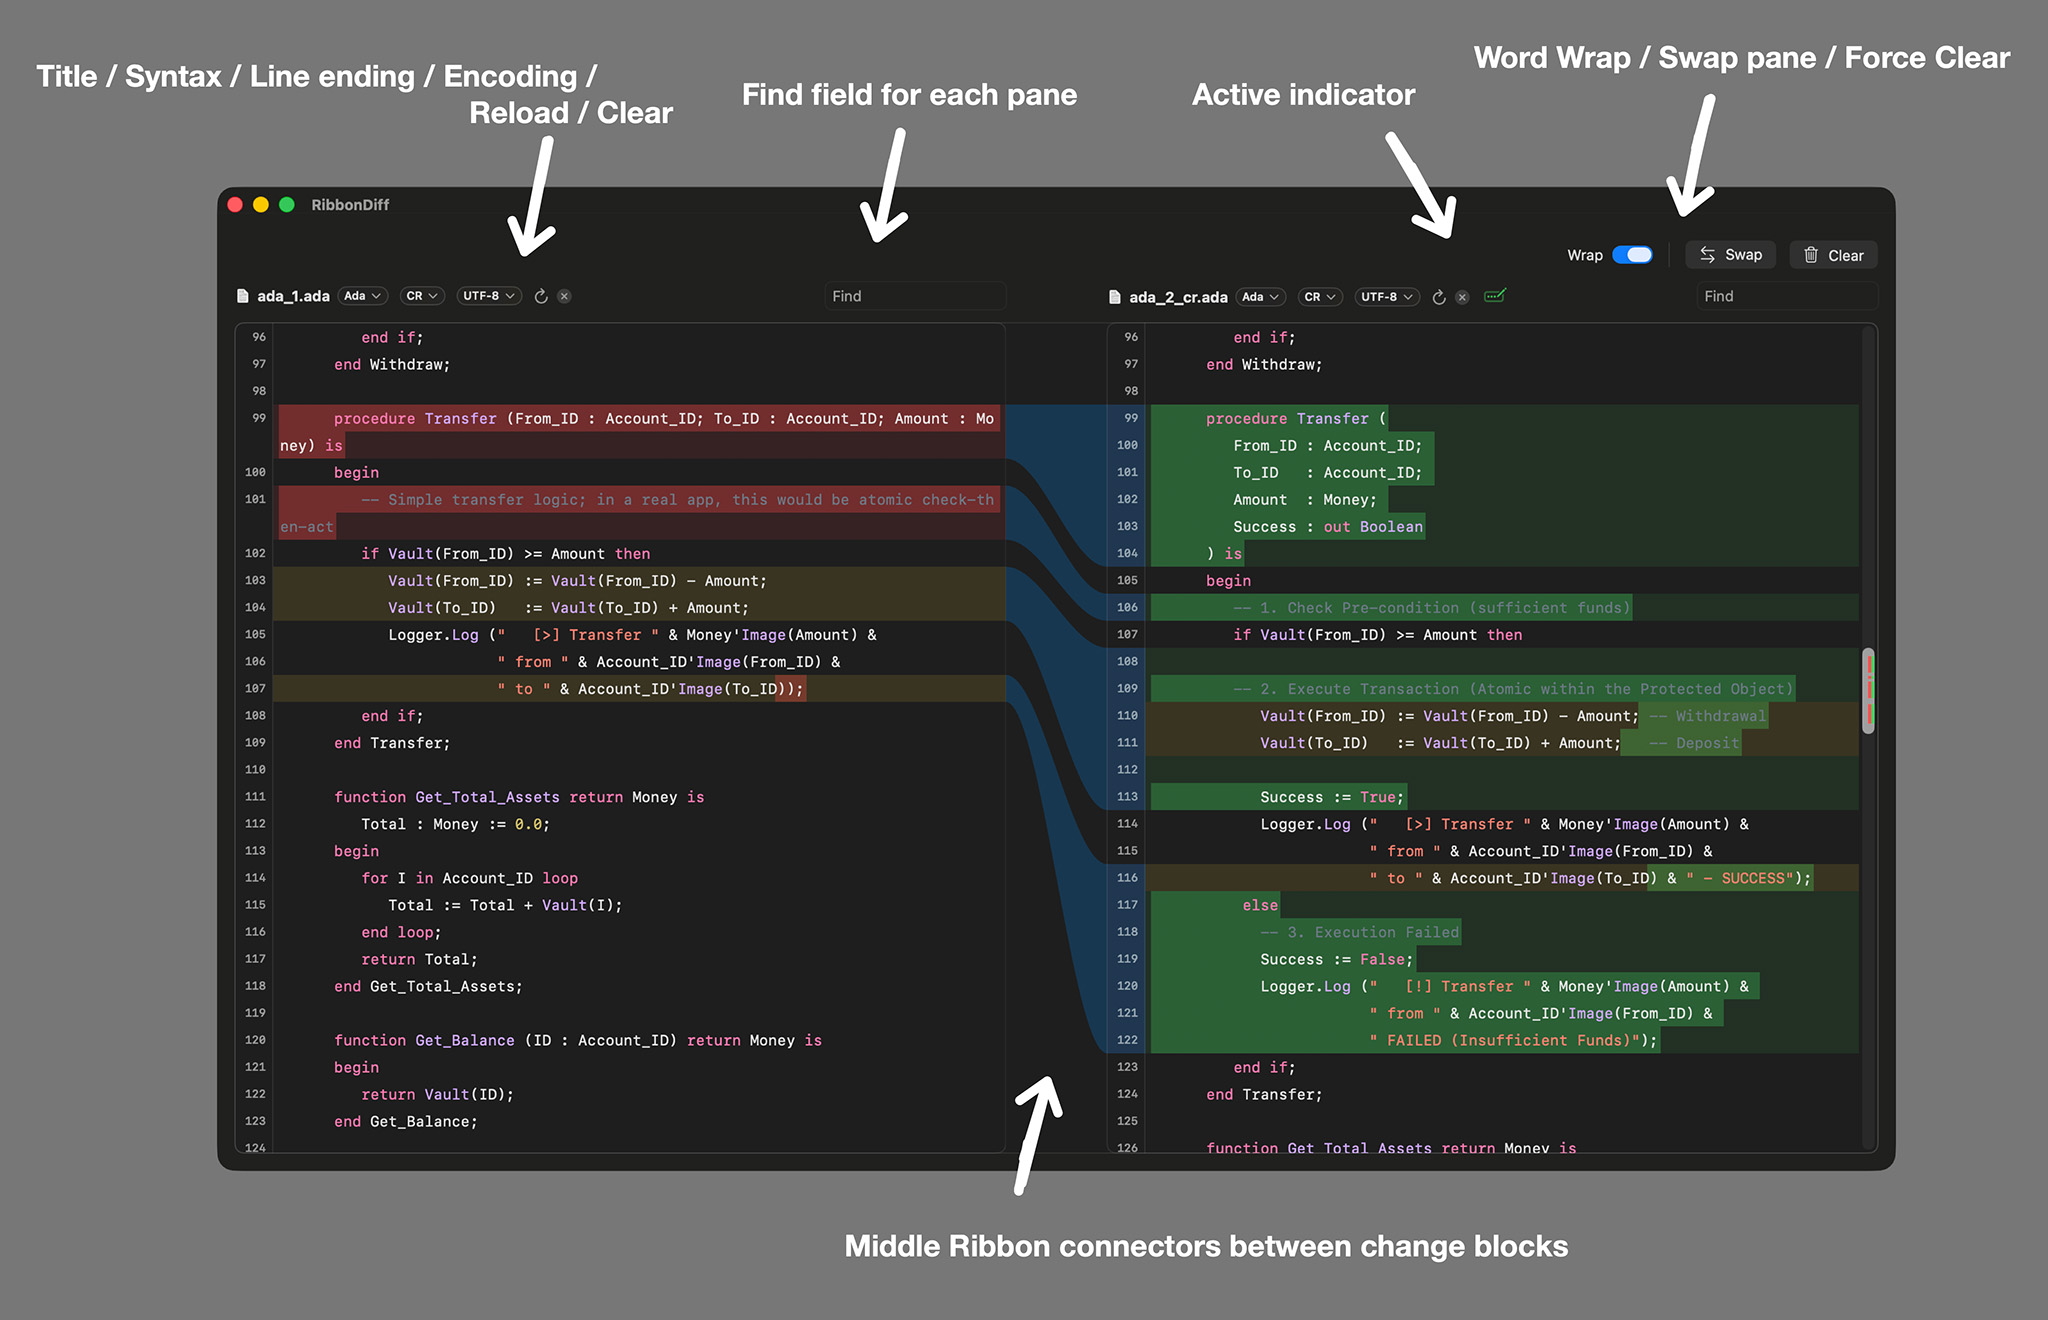
The screenshot above shows the core comparison layout. The same window can also show the Pro-only Workspace sidebar, Workspace file search, and Version History controls when those workflows are active.
Toolbar (top controls row)
The top controls row acts as a lightweight toolbar for window-level actions. Choose View → Hide Toolbar / View → Show Toolbar or press ⌥⌘T to hide or reveal this row. RibbonDiff remembers this visibility setting across launches.
-
Wrap: Toggles word wrap in this window. Also available from View → Word Wrap.
Shortcut:⌃⌘W -
Whitespace: Toggles the saved whitespace filters for the current comparison. This switch turns Ignore indentation style, Ignore leading whitespace, and Ignore trailing whitespace on or off together. Also available from View → Whitespace Filters.
Shortcut:⌃⌘I -
Swap: Swaps the left/right texts (and any file association for each pane). Also available from View → Swap Panes.
Shortcut:⌃⌘S -
Clear: Clears both panes. If either pane has unsaved edits, the trash icon turns orange as a warning. Also available from Edit → Clear.
Shortcut:⌃⌘K
Window actions
- New standalone windows: choose File → New Window (
⌘N) to open a new comparison window with the Workspace sidebar closed, or File → New Window with Sidebar (⇧⌘N) to open one with the sidebar open. - New tab: press
⌘Tto open another tab in the current window group.
Window chrome controls
- Editor title bar: the pane-header row that contains each pane's title area, Find field, badges, reload control, preview lock, and clear control. Choose View → Hide Editor Title Bar / View → Show Editor Title Bar or press
⌃⌘T. RibbonDiff remembers this setting across launches. - Find when the title bar is hidden: pressing
⌘Fautomatically shows the editor title bar again so the active pane's Find field can take focus. - Native tab bar: choose File → Hide Tab Bar / File → Show Tab Bar or press
⇧⌘Tto toggle macOS's tab strip. On some macOS versions, the File menu may not show this shortcut next to the command even though the shortcut still works. RibbonDiff remembers this setting across launches.
Workspace sidebar
- Workspace tree 👑: browse a folder or
.rd-workspacedocument in a dedicated sidebar that is shared across every tab in the window. - Workspace file search 👑: press
⇧⌘Fto search text across the open Workspace, with results grouped by file and Git-modified files marked with M. - File Tree / File Search switching: use View → Show File Tree (
⌘1) and View → Show File Search (⌘2) to switch the Workspace sidebar mode. - Workspace actions: the sidebar header menu can add files or folders at the workspace root and show the workspace folder in Finder.
- Context menus: right-click folders to add files or folders, delete items, show them in Finder, or copy their paths; right-click files to open in a new tab, delete them, show them in Finder, or copy their paths.
- Multi-select: Command-click toggles items and Shift-click selects a visible range for moving or deleting multiple items.
- Inline rename: new items stay in the tree while you edit the name, with validation for empty names,
/characters, and duplicate names. - Open-file indicators: files that are already open in tabs are marked in the sidebar.
- Active-file highlight: the current file stays highlighted as you move between tabs.
- Git status: Git-tracked files that are modified can show an M badge, and changed files can be revealed automatically in the tree.
- Modified Files quick access: when Git reports modified files, RibbonDiff can show a collapsible quick-access section above the tree so you can jump straight to changed files or copy their paths.
- Modified Files resizing: drag the divider below the quick-access list to resize it live. By default, the expanded section shows up to six rows before it scrolls.
- Modified Files state: tabs in the same window group share the section's collapsed/expanded state and committed expanded height, while the live drag stays local to the tab you are resizing until you release the divider.
- Native feel: the sidebar uses native macOS file icons, dims in inactive windows, and gives more room to long file and folder names.
Change navigation
-
Jump to the previous/next changed block (added/removed/modified). Use the up/down chevrons above the center Ribbon, or Navigate → Previous Change / Navigate → Next Change in the menu bar.
Shortcuts:⌥⌘↑(Previous Change),⌥⌘↓(Next Change)
Pane header (each side)
Each pane has a header row containing:
- Title area: outside Workspace windows, shows the opened file name, a Version History preview title, or Text 1 / Text 2. In Workspace-bound windows, RibbonDiff omits this text in the pane header to leave more room for badges and Find.
- Active-pane marker: the pane you most recently focused shows a small active-editor mark next to its title area. It turns orange when that pane has unsaved changes.
- Find field: each pane has its own Find field in the header row. Press
⌘Fto focus the active pane's field; if the editor title bar is hidden, RibbonDiff shows it first. Matches highlight as you type. - Syntax badge: shows detected syntax (Auto) or your manual selection.
- Line endings badge (optional): when enabled in RibbonDiff → Settings…, shows LF/CRLF/CR and controls which line endings are written when saving. This badge is hidden for read-only Version History previews.
- Encoding badge (optional): when enabled in RibbonDiff → Settings…, shows the current text encoding (for example UTF-8, UTF-16LE, UTF-32) and controls which encoding is used when saving. This badge is hidden for read-only Version History previews.
- Reload icon (↻, file-backed panes only, and only when the Encoding badge is enabled): opens the Reload with Encoding sheet so you can choose an encoding and reload the file from disk. Use this if the file opens with the wrong encoding (garbled text). Reload discards unsaved changes in that pane.
- Read-only preview lock: when a pane is showing a Version History snapshot, a lock icon appears to show that the preview cannot be edited.
- Clear control: file-backed panes and Version History previews show an × button; unbound text panes show a trash button. For a file-backed pane, × unbinds the file and clears the pane. For a Version History preview, × clears the preview. These icons become orange when the pane has unsaved changes. Clearing or unbinding either pane also clears diff highlights until both panes have content again.
Version History controls
- Branch selector 👑: for files inside a Git-backed Workspace, browse branches directly inside RibbonDiff.
- Version selector 👑: choose historical revisions, with commit summaries, short hashes, authors, and relative dates shown in the selector.
- Commit filter popover: search commits by summary, hash, or author, and switch between Affected and All when you want either file-specific history or the full branch history.
- Live Edit: when the left side is anchored to the current Workspace file, the version selector can jump back to the editable working-tree version after you inspect history.
- Affected-revision highlight: revisions that touched the current file are highlighted so the meaningful history is easier to spot.
Window / tab title: when either pane is opened from a file, the macOS window and tab title follows that file name. If both panes are file-backed, the left file name wins. If neither pane is file-backed, the title falls back to RibbonDiff. In Workspace-based sessions, titles behave more naturally as you switch files and tabs. When a file is supplying the title, macOS also shows the standard proxy icon and path menu in the title bar.
The editors + Ribbon
- Left editor: usually treated as Original. Files opened from Workspace stay pinned on the left side so the Workspace file remains the anchor for the diff.
- Right editor: usually treated as Modified.
- Historical preview 👑: when Version History is active, RibbonDiff keeps the current file and the historical snapshot oriented correctly so add/remove highlighting stays intuitive.
- Middle Ribbon: connectors between change blocks (shown once both panes have content), plus a progress spinner while the diff is computing.
- Current-line highlight: the active caret line is shown with a subtle band so it is easier to stay oriented while editing.
- Scrolling: editor scrolling follows standard macOS behavior, including rubber-band scrolling.
3. Comparing text (how the diff is shown)
RibbonDiff highlights changes using configurable colors:
Diff highlights (line background tints, change markers, and the center Ribbon) appear once both panes have content. Clearing or unbinding either pane hides the diff until both sides have text again. When a comparison first becomes available (for example after opening files, selecting a Workspace file, or pasting into the second pane), RibbonDiff automatically scrolls to the first changed block (if any).
- Added: content that exists only on the right side.
- Removed: content that exists only on the left side.
- Modified: changed regions (and in many cases, changed fragments within a line).
- Connector (Ribbon): the middle links between changed blocks.
When you compare current content against Version History, RibbonDiff keeps the current file and the historical preview aligned so add/remove highlighting continues to read naturally.
Navigate between changes (Next/Previous Change)
For large diffs, you can jump directly between changed blocks without manually scrolling.
How to use
- Click the chevron up / chevron down buttons above the middle Ribbon.
- Or use the menu bar: Navigate → Previous Change / Navigate → Next Change.
- Keyboard shortcuts:
⌥⌘↑(Previous Change),⌥⌘↓(Next Change).
What counts as a “change”
- Added, Removed, and Modified blocks.
- Unchanged regions are skipped.
Notes
- Tip: When a comparison first becomes available, RibbonDiff automatically scrolls to the first change (if any).
- Navigation follows the active pane (left or right). Click in a pane to make it active.
- If linked scrolling is enabled, RibbonDiff keeps the other pane aligned to the corresponding block.
- When you reach the end (or beginning), navigation wraps around.
- Change navigation stays aligned with the active pane even right after RibbonDiff auto-jumps to the first change.
4. Workspace 👑
Workspace is available in Pro (Pro Trial or Pro Lifetime). It gives RibbonDiff a project-aware sidebar so you can browse files and compare them without rebuilding context for every new diff.
What Workspace does
- Open a folder or a
.rd-workspacedocument into a dedicated sidebar. - Keep one shared Workspace per window, not per tab. Every tab in that window uses the same project context.
- Open a selected file directly into the left side of the comparison, where it stays pinned as the anchor for the diff.
- Search text across files in the Workspace, then open a matching file and selected line directly from the result list.
- Create new files and folders with inline rename, then move, delete, and reveal files or folders while staying in the Workspace tree.
- Move between related comparisons without losing your place in the project tree.
Opening a workspace source
- File → Open Workspace… (
⇧⌘O) opens the chosen folder or.rd-workspacedocument in a new standalone window. - The empty sidebar's Open Folder or Workspace File button, or dropping a folder /
.rd-workspacefile onto the sidebar, binds a workspace to the current window. - When you bind a workspace to the current window, RibbonDiff closes sibling tabs first and asks you to save or discard unsaved work before replacing the current comparison.
Browsing and opening files
- Click a file in the Workspace tree to open it into the current tab.
- Option-click a file to open it in another tab.
- If the file is already open in a tab, clicking it again switches to that existing tab instead of opening a duplicate.
- The active file remains highlighted in the sidebar while you work.
Dot-prefixed files and hidden metadata
- Dot-prefixed files and folders such as
.env,.gitignore, and.githubappear in the Workspace file tree. - Repository metadata folders such as
.git,.hg,.svn, and.DS_Storeremain hidden.
Searching Workspace files
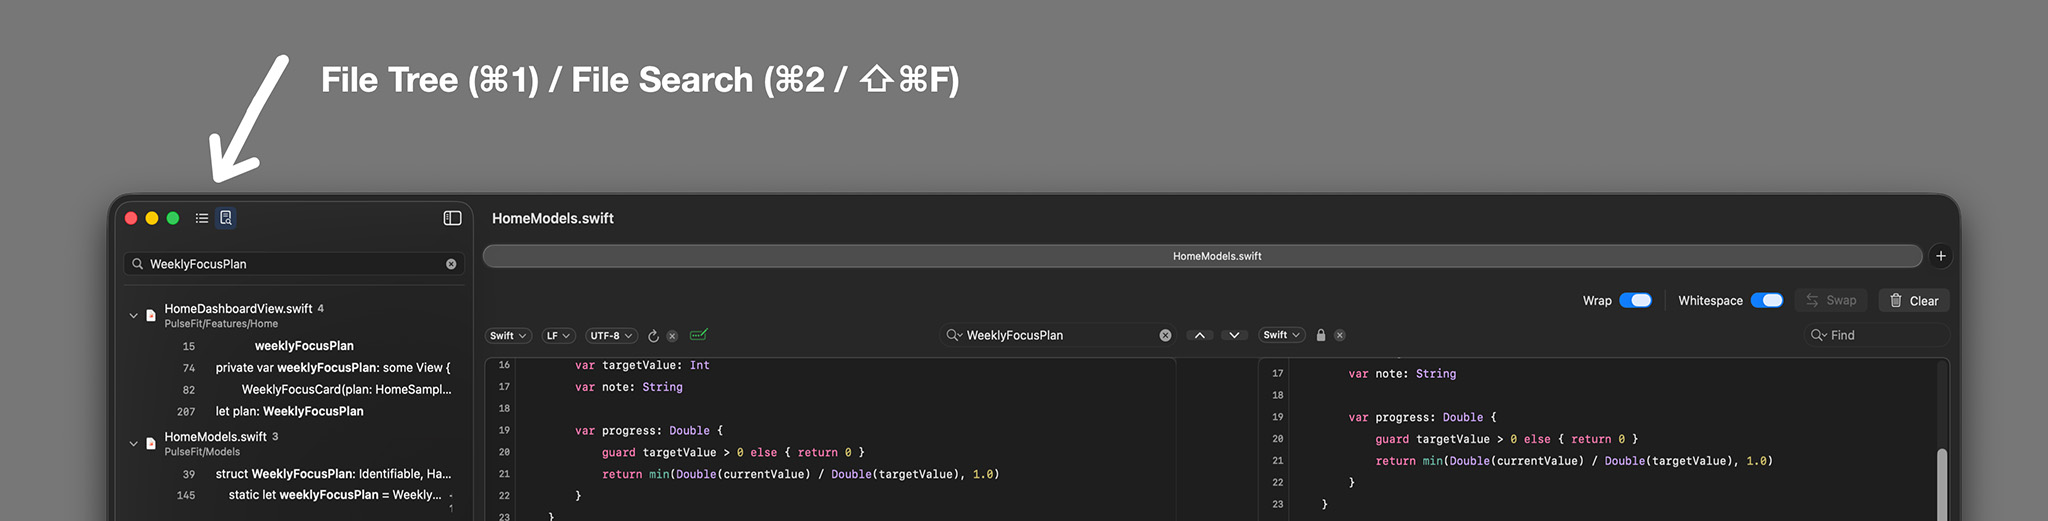
- Choose Find → Find in Workspace… or press
⇧⌘Fto switch the sidebar to File Search and focus the search field. - Type a query to search readable text files in the open Workspace.
- Results are grouped by file in Workspace order and show folder context, line numbers, match counts, highlighted previews, and the same M marker used for Git-modified files in the file tree.
- Expand or collapse a file group to show or hide its matching lines.
- Click a matching line to open that Workspace file in the left editor and keep the editor focused on the clicked match.
- Option-click a result header or matching line to open it in another tab while preserving the revealed match.
- Right-click a result header for Open in New Tab, Copy Relative Path, or Copy Full Path.
- Use View → Show File Tree (
⌘1) and View → Show File Search (⌘2) to switch between the file tree and search results. - RibbonDiff keeps file search visible when you move between tabs, and keeps your search query, results, expanded files, and scroll position when you switch between sidebar modes.
- Workspace file search refreshes after Workspace files change or when a Workspace file is saved.
Managing files and folders from the sidebar
- Use the Workspace Actions menu at the top of the sidebar to add a new file, add a new folder, or show the workspace folder in Finder.
- Right-click a folder for Add New File, Add New Folder, Rename, Delete, Show in Finder, Copy Relative Path, or Copy Full Path.
- Right-click a file for Open in New Tab, Rename, Delete, Show in Finder, Copy Relative Path, or Copy Full Path.
- New files are given unique names such as
Untitled.swiftorUntitled 2.swiftwhen RibbonDiff can infer an extension from the target folder. If it cannot infer one, it falls back toUntitled.txt. - New folders use unique names such as
Untitled FolderorUntitled Folder 2. - After creating an item or choosing Rename, edit the inline name and press Return to commit or Escape to cancel. RibbonDiff rejects empty names, names containing
/, and duplicates in the same folder. - Delete moves selected files or folders to the Trash after confirmation. Folder deletion includes the folder contents, and the workspace root cannot be deleted from the sidebar.
Selecting and moving Workspace items
- Command-click toggles individual files or folders in the visible tree.
- Shift-click selects a visible range from the current selection anchor.
- Drag selected items onto a folder, or into empty space in the tree to move them to the workspace root.
- When both a folder and one of its children are selected, RibbonDiff moves or deletes the outer folder once instead of repeating the child operation.
- RibbonDiff blocks moves into the same folder, into the item itself or one of its descendants, outside the workspace, or onto a destination with a duplicate name.
- After a successful move, open editors, sidebar selection, expansion state, file monitoring, and Git status refresh to the new paths.
Workspace documents
- Workspaces can be saved as
.rd-workspacedocuments and reopened later. - Use Open Workspace… (
⇧⌘O) to open the Workspace document picker in a new window, or use the sidebar button/drop target to replace the current window's comparison with a workspace. - RibbonDiff preserves the sidebar's folder expansion state when saving and reopening a Workspace document.
- Workspace windows restore more cleanly across relaunches, including safer placement after display changes.
Sidebar cues and Git-aware hints
- Native macOS file icons make the sidebar feel like the rest of the system.
- Files that are already open in tabs show clearer indicators in the tree.
- Git-tracked files can show an M badge when modified, including in Workspace file search results.
- A collapsible Modified Files section can appear above the tree so you can jump to changed files quickly or copy their relative or full paths.
- You can drag the divider below Modified Files to resize that quick-access area live. By default, the expanded section shows up to six rows before it scrolls.
- Tabs in the same window group share the section's collapsed/expanded state and committed expanded height, while the live drag stays local to the tab you are resizing until you release the divider.
- Changed files can be revealed automatically in the tree when they become modified.
- The sidebar dims automatically in inactive windows, and it allows wider sizing for long names.
Note: Workspace is a Pro feature. In Limited mode, RibbonDiff shows the Pro prompt instead of opening the sidebar. See Access levels.
5. Version History 👑
Version History is a Pro-only Workspace feature: for files inside a Git-backed Workspace, RibbonDiff can browse branches and revisions directly inside the app and compare the current file against read-only historical snapshots.
What you can do
- Browse branches without leaving RibbonDiff.
- Choose historical revisions from inside the comparison workflow.
- See commit summaries, hashes, authors, and dates in the branch/version selectors.
- Search the revision list by summary, hash, or author.
- Switch between Affected and All commit scopes when you want only commits that touched the current file, or the full branch history.
- Spot which revisions actually touched the current file more easily, because those revisions are highlighted.
- Preview older content as read-only text directly in the comparison view.
- Return to Live Edit on the left side after browsing history.
Typical workflow
- Open a file from a Git-backed Workspace.
- Choose a branch, if needed.
- Choose a historical revision from the version selector.
- Review the read-only snapshot against the current file, using the diff colors and Ribbon to see what changed.
Notes
- Version History requires Pro, and the file must be inside a Git-backed Workspace.
- Historical previews are for inspection; they are not editable in place.
- RibbonDiff keeps the current file and historical preview oriented so add/remove highlighting stays intuitive.
6. Opening files and folders 👑
All opening workflows in this section require Pro (Pro Trial or Pro Lifetime). That includes drag and drop, File → Open…, Finder opens, Terminal/CLI opens, and opening a Workspace. In Limited mode, RibbonDiff compares typed or pasted text and shows the Pro prompt if you try one of these workflows.
Drag and drop (Finder → pane)
- Drop a file directly onto the left or right pane to open it there.
- RibbonDiff uses the file extension (for example
.swift,.json,.md) to choose an initial syntax highlighting language.
Overwrite protection: RibbonDiff avoids overwriting text accidentally.
- If the pane already contains text, you'll be prompted to clear it first.
- If the pane already has a file open with unsaved edits, RibbonDiff refuses to replace it until you clear or unbind.
- If a pane is file-backed and has no unsaved edits, RibbonDiff can offer a Replace confirmation.
Open from the menu (⌘O)
- Click inside the target pane first (left or right).
- Choose File → Open… (
⌘O). - RibbonDiff applies the same overwrite rules as drag-and-drop.
Open a Workspace 👑
- Choose Open Workspace… (
⇧⌘O) to open the Workspace document picker in a new standalone window. - The picker accepts either a folder or an existing
.rd-workspacedocument. - Use the sidebar's Open Folder or Workspace File action, or drop a folder /
.rd-workspacefile onto the sidebar, to bind a workspace to the current window instead. - The Workspace belongs to a window, so every tab in that window shares the same sidebar and project tree.
- Saved
.rd-workspacedocuments reopen with folder expansion state preserved.
Open from Finder (double-click / “Open With…”)
- You can open files directly from Finder:
- Set RibbonDiff as the default app for a file type and double-click, or
- Right-click a file and choose Open With → RibbonDiff.
- RibbonDiff opens up to two files per tab:
- 1 file: opens in the left pane.
- 2 files: first file → left, second file → right.
- 3+ files: opened in pairs across tabs by default: (1,2), (3,4), …
Open from Terminal (CLI)
You can open files from the command line using macOS's built-in open command:
open -a RibbonDiff /path/to/old.txt /path/to/new.txtIf your file paths contain spaces, quote them:
open -a "RibbonDiff" "Old File.txt" "New File.txt"Tab/window behavior (overwrite protection)
- Default: RibbonDiff reuses the frontmost tab only when both panes are blank and not currently opened from a file (a fresh tab). Otherwise it opens the files in a new tab (or a new window if needed) so your current comparison is not overwritten.
Advanced: reuse modes (CLI wrappers)
Some CLI wrappers can request a different reuse policy when opening files. RibbonDiff reads this policy from an optional control file included in the same open request.
- Automatic (default): reuse the current tab/window only when both panes are blank and not currently opened from a file (a fresh tab); otherwise open a new tab/window.
- Reuse: reuse the current tab/window when there are no unsaved edits; otherwise open a new tab/window.
- Force Reuse: always reuse the current tab/window (this can discard unsaved edits).
Note: When using Reuse or Force Reuse, opening 3+ files (multiple pairs) may reuse the same tab repeatedly. In that case, the last pair wins. Use Automatic if you want each pair to open in its own new tab/window.
Control file requirements
- Name: the file name must start with
ribbondiff-cli-or.ribbondiff-cli-(for exampleribbondiff-cli--control.jsonor.ribbondiff-cli--control.json). The extension can be anything, but.jsonis recommended. - Contents: JSON with a
modefield (case-insensitive):automatic(also acceptsautoanddefault),reuse, orforceReuse. For Force Reuse,force-reuse,force_reuse, andforceare also accepted. - Validation: RibbonDiff treats the file as a control file only when the JSON decodes and the
modevalue is recognized. Otherwise, the file is treated as a normal file to open/diff. - Multiple control files: if more than one valid control file is provided, the last valid one wins.
- Not opened as content: when recognized as a control file, it is used for configuration only — it does not populate a pane.
Example (create a control file, then open two files):
echo '{"mode":"reuse","version":1}' > /tmp/.ribbondiff-cli--control.json
open -a RibbonDiff /tmp/.ribbondiff-cli--control.json old.txt new.txt
7. Saving files and workspaces 👑
Saving files and saving Workspace documents require Pro (Pro Trial or Pro Lifetime). RibbonDiff saves per pane (whichever pane is active). Historical previews from Version History are read-only; save the live file instead.
Save (⌘S)
- If the pane was opened from a file, Save writes back to that same file.
- If the pane is not backed by a file yet, Save behaves like “create a new file” and prompts you to pick a location.
Save As (⇧⌘S)
- Always prompts for a new destination and file name.
- If the pane is already file-backed, Save As uses the current file name as the default suggestion.
Saving Workspaces
- Workspaces can be saved as
.rd-workspacedocuments and reopened later. - Save Workspace creates a new
.rd-workspacedocument for a folder-backed workspace. Shortcut:⇧⌥⌘S. - Once a workspace is already backed by a
.rd-workspacedocument, RibbonDiff keeps the saved sidebar state updated in place and the File menu command changes to Save Workspace As… if you want another workspace document. - A saved Workspace keeps the project context and the sidebar's folder expansion state so you can return to the same layout later.
- Workspace windows also restore more reliably across relaunches.
Line endings and encoding
RibbonDiff focuses the diff on text content, not file storage details. Line endings and character encodings are normalized internally, so two files can compare as identical even if they use different line-ending styles or different Unicode encodings.
Line endings
- What it is: a line ending is how a file separates lines: LF (
\n), CRLF (\r\n), or CR (\r). - How RibbonDiff diffs: line endings are normalized internally, so LF vs CRLF does not create a diff by itself.
- Pane badge: when enabled in RibbonDiff → Settings…, each editor pane shows an LF/CRLF/CR badge. Use it to choose which line endings are written on the next save.
- Opening files: RibbonDiff detects the file's dominant line-ending style when you open it and sets the badge accordingly.
- Saving files: RibbonDiff saves the file using the badge's current selection. Changing only the line-ending badge can rewrite the file without changing the visible text — this is expected.
Text encoding
- What it is: encoding is how characters are stored as bytes on disk. RibbonDiff works with Unicode text internally.
- How RibbonDiff diffs: files are decoded to Unicode text before diffing. If two files decode to the same text (for example, one is UTF-8 and the other is UTF-32), the diff will look identical.
- Pane badge: when enabled in RibbonDiff → Settings…, each editor pane shows an Encoding badge. The badge controls which encoding is used on the next save. (Changing the badge does not re-decode the already-open text.)
- Opening files: RibbonDiff tries to auto-detect the file's text encoding when you open it. If auto-detection is ambiguous, RibbonDiff shows a Choose Encoding sheet — pick the correct encoding to open the file.
- Fixing garbled text: if the text looks wrong (mojibake), use the pane's Reload control (↻) to Reload with Encoding, choose a different encoding, and reload from disk. (Reload discards unsaved edits in that pane.)
- Saving files: RibbonDiff writes the file using the encoding shown in the badge. Choose UTF-8 (with BOM) if you need a BOM on save. Changing only the encoding badge can rewrite the file without changing the visible text — this is expected.
Supported encodings
These options appear in the per-pane Encoding badge menu:
| Category | Encodings |
|---|---|
| Unicode | UTF-8, UTF-8 (with BOM), UTF-16, UTF-16 Little Endian, UTF-16 Big Endian, UTF-32, UTF-32 Little Endian, UTF-32 Big Endian |
| Japanese | Shift_JIS, EUC-JP, ISO-2022-JP, x-mac-japanese |
| Chinese | GB18030, GBK, GB2312, HZ-GB-2312, Big5, Big5-HKSCS |
| Korean | EUC-KR, CP949 |
| Western | Windows-1252, MacRoman, Windows-1250 (Central European), Windows-1251 (Cyrillic), Windows-1253 (Greek), Windows-1254 (Turkish), Windows-1257 (Baltic), ISO-8859-1 (Latin-1), US-ASCII |
| Middle Eastern | Windows-1255 (Hebrew), Windows-1256 (Arabic) |
| Southeast Asian | Windows-874 (Thai), Windows-1258 (Vietnamese) |
Tip: When you are comparing clipboard text (not a file), the pane defaults are typically LF + UTF-8 for saving.
8. When files change on disk
RibbonDiff handles externally changed files gracefully.
- If an opened file changes on disk and you have no unsaved edits in RibbonDiff, the pane reloads automatically.
- If the pane has unsaved edits inside RibbonDiff, the app prompts before replacing those in-app changes with the new on-disk contents.
- This keeps file-backed panes aligned with what is really on disk, while still protecting edits you have not saved yet.
- If you need to re-open the same file with another encoding instead, use the pane's Reload control rather than waiting for an automatic reload.
9. Unsaved changes behavior
RibbonDiff tracks unsaved edits independently for each pane.
- The window shows the standard macOS document-edited dot when either pane has unsaved edits.
- Unsaved changes include text edits and also changes to the per-pane Line endings and Encoding badges (when enabled in Settings).
- In Workspace sessions, tabs can show unsaved changes while the active file remains highlighted in the sidebar.
- If you close a window/tab (
⌘W) with unsaved edits, RibbonDiff shows an Unsaved Changes alert with:- Cancel
- Close Without Saving
Note: The close prompt is intentionally “no-save” — save the relevant pane(s) first using
⌘Sor⇧⌘S👑.
10. Find (search) in either pane
RibbonDiff uses per-pane Find fields in the header row, while still honoring the standard macOS Find shortcuts for the active pane.
Basic use
- Click in the left or right editor to make that pane active.
- Press ⌘F to focus that pane's Find field in the header. If the editor title bar is hidden, RibbonDiff shows it first. If text is selected in the editor, RibbonDiff uses that selection as the query. Otherwise, if that pane's Find field is empty, RibbonDiff can prefill it from the standard macOS shared Find string.
- Type your query. Case-insensitive matches are highlighted as you type.
- Press Return or ⌘G for the next match, and ⇧Return or ⇧⌘G for the previous match. Find navigation wraps around when you reach the end or beginning of the pane.
Keyboard shortcuts
- Find…:
⌘F(focuses the active pane's Find field) - Find Next:
⌘G - Find Previous:
⇧⌘G - Use Selection for Find:
⌘E
Notes
- Each pane keeps its own Find query, but RibbonDiff also syncs with the standard macOS shared Find string.
- Find actions follow the active pane. Clicking a pane's editor or its Find field makes that side active.
- Find highlight colors can be customized in Settings → Appearance, with separate Light and Dark overlay colors.
- Use Selection for Find (
⌘E) uses the selected text in the active editor. - Press Esc while editing a Find field to return focus to that pane's editor.
- Use the Find field's menu for Find Next, Find Previous, Recent Searches, and Clear Recent Searches.
Find in Workspace 👑
When a Workspace is open, choose Find → Find in Workspace… or press ⇧⌘F to search across readable text files in that Workspace. Results appear in the Workspace sidebar, grouped by file, with Git-modified files marked by M. Clicking a matching line opens the file in the left editor and keeps focus on that match; Option-click opens the result in another tab.
- Show File Tree:
⌘1 - Show File Search:
⌘2 - Find in Workspace…:
⇧⌘F
11. Syntax highlighting
RibbonDiff includes built-in syntax highlighting and automatic language detection.
Auto vs manual
- Auto: RibbonDiff detects the language from the text.
- Manual override: click the syntax badge and pick a language.
Supported languages (badge)
- Plain text
- Swift
- C-like (C/C++/ObjC style)
- C#
- Java
- Kotlin
- PHP
- Go
- Ada
- Rust
- Python
- Ruby
- Lua
- Dart
- JavaScript / TypeScript family
- CSS
- Shell
- SQL
- JSON
- YAML
- TOML
.env- Dockerfile
- HTML/XML
- Markdown
Markdown fenced code blocks
In Settings you can choose whether Markdown fenced blocks (``` / ~~~) are highlighted using the language tag after the fence (for example ```swift). Fenced blocks can use the same expanded language coverage, including CSS, Shell, SQL, TOML, .env, Dockerfile, TypeScript, C#, Kotlin, Ruby, Lua, and Dart.
12. Toolbar, title bar, tab bar, wrap, and Ribbon width
Toolbar visibility
- Choose View → Hide Toolbar to hide the top controls row (Wrap, Whitespace, Swap, and Clear).
- Choose View → Show Toolbar to bring the row back.
- Shortcut:
⌥⌘T - RibbonDiff remembers this visibility setting across launches.
- The pane headers, Find fields, change navigation buttons, and Workspace sidebar (if open) stay visible when the toolbar is hidden.
Editor title bar visibility
- Choose View → Hide Editor Title Bar to hide the pane-header row.
- Choose View → Show Editor Title Bar to bring it back.
- Shortcut:
⌃⌘T - The editor title bar contains each pane's title area, Find field, badges, reload button, preview lock, and clear/unbind control.
- If you press
⌘Fwhile the editor title bar is hidden, RibbonDiff reveals it automatically so the active pane's Find field can take focus.
Tab bar visibility
- Choose File → Hide Tab Bar / File → Show Tab Bar to toggle the native macOS tab strip.
- Shortcut:
⇧⌘T - On some macOS versions, the File menu may not display this shortcut next to the command even though
⇧⌘Tstill works. - RibbonDiff remembers this setting across launches.
- This controls macOS's tab bar, not the Workspace sidebar.
Word wrap
- Toggle Wrap in the toolbar when it is visible, or choose View → Word Wrap (window-local).
- Shortcut:
⌃⌘W - View → Word Wrap and the shortcut still work even when the toolbar is hidden.
Important: Wrap is per window, not global. Settings only set the default for newly opened editor windows.
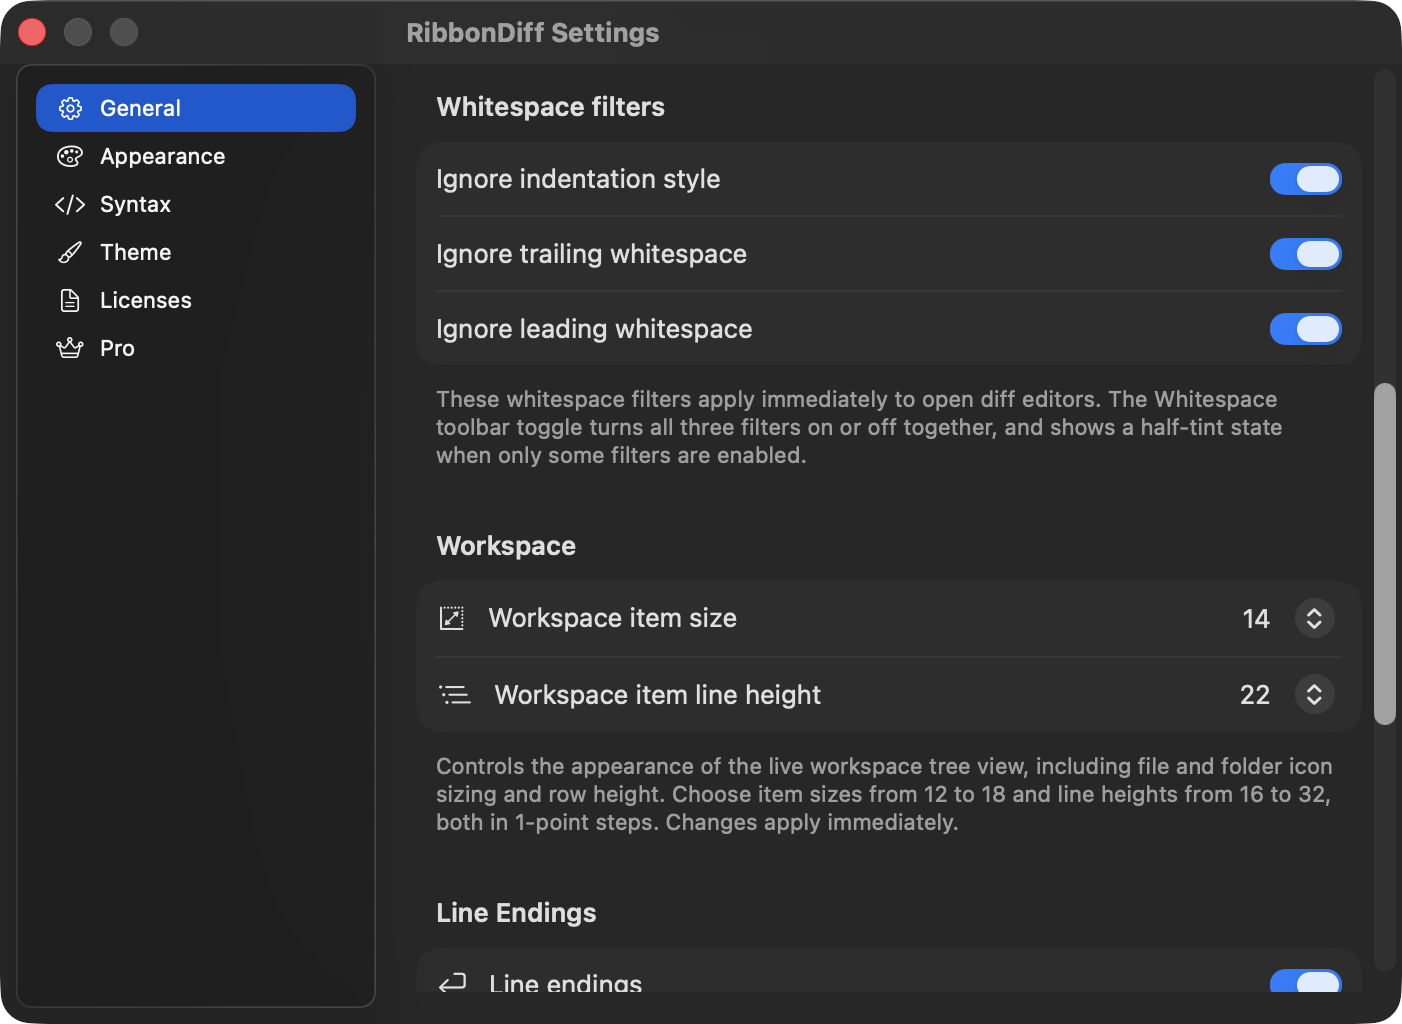
Whitespace filters
- Toggle Whitespace in the toolbar when it is visible, or choose View → Whitespace Filters.
- Shortcut:
⌃⌘I - This master toggle turns all three whitespace-comparison options on or off together: Ignore indentation style, Ignore leading whitespace, and Ignore trailing whitespace.
- If only some whitespace filters are enabled, the toolbar switch shows a mixed state, but using it still turns the full set on or off together.
- The saved whitespace-filter defaults apply immediately to open diff editors.
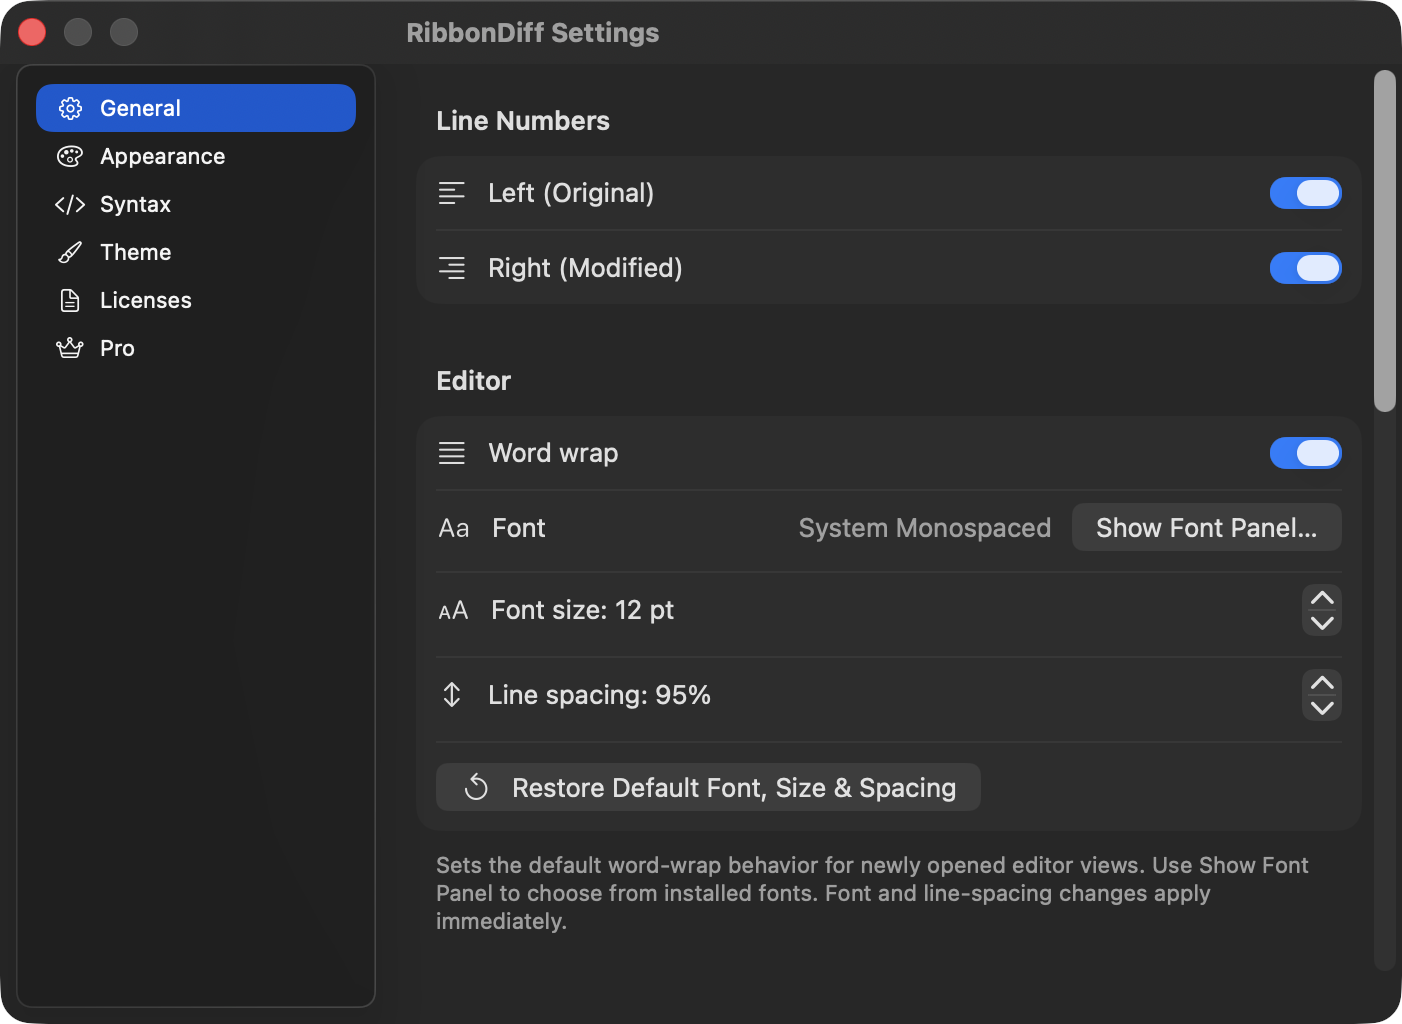
Line numbers
Enable/disable line numbers independently for:
- Left (Original)
- Right (Modified)
You can change this in Settings.
Ribbon Column width
- RibbonDiff includes a Ribbon Column width setting in Appearance.
- You can adjust the center Ribbon from 60 to 120.
- Use narrower values to give more room to the editors, or wider values to give the Ribbon more visual emphasis.
Font, font size and line spacing
RibbonDiff lets you adjust the editor typography so long comparisons are easier on your eyes.
- Open RibbonDiff → Settings… (
⌘,) and go to General → Editor. - On macOS, use Show Font Panel… to choose from your installed fonts. The current selection is shown next to Font.
- Adjust Font size and Line spacing. These changes apply immediately to both panes.
- While editing, use
⌘=(or⌘+on keyboards where+shares the same key) to increase text size,⌘-to decrease it, and⌘0to reset the editor text size. The current text size is shared by both panes and persists across launches. - Use Restore Default Font, Size & Spacing to return all three editor typography settings to their defaults.
Editing behavior
- Auto-indent on Return: pressing Return continues the current line's indentation automatically.
- Indent / outdent with Tab: use Tab to indent and Shift-Tab to outdent the current line or selected lines.
- Bulk indent / outdent: use ⌘] to indent and ⌘[ to outdent the current line or selected lines.
- Inferred indentation: RibbonDiff tries to detect the active pane's indentation width from its text and uses that when editing. If it cannot infer a clear style, it falls back to the default indentation width.
- Current-line highlight: the caret line is highlighted subtly to help you track your position while editing.
13. Preferences and themes
Open Settings from the app menu:
- RibbonDiff → Settings… (usually
⌘,)
General
- Toggle line numbers independently for Left (Original) and Right (Modified).
- Set the default Word wrap behavior for newly opened editor views. Existing editors keep their current wrap setting.
- Set the default whitespace-filter behavior with Ignore indentation style, Ignore leading whitespace, and Ignore trailing whitespace. These settings apply immediately to open diff editors.
- Choose the editor Font, Font size, and Line spacing; on macOS, use Show Font Panel… to browse installed fonts. These typography changes apply immediately.
- Use Restore Default Font, Size & Spacing to reset only the editor typography.
- Adjust Workspace item size and Workspace item line height for the Workspace sidebar.
- Enable the per-pane Line endings badge (LF/CRLF/CR) and the per-pane Encoding badge (for example UTF-8, UTF-16LE, or UTF-32).
- Use Reset to Defaults to restore line numbers, colors, backgrounds, find overlay colors, syntax settings, editor/workspace options, and theme selection to the built-in defaults. The default built-in theme is Vivid. Imported user themes remain available.
Appearance
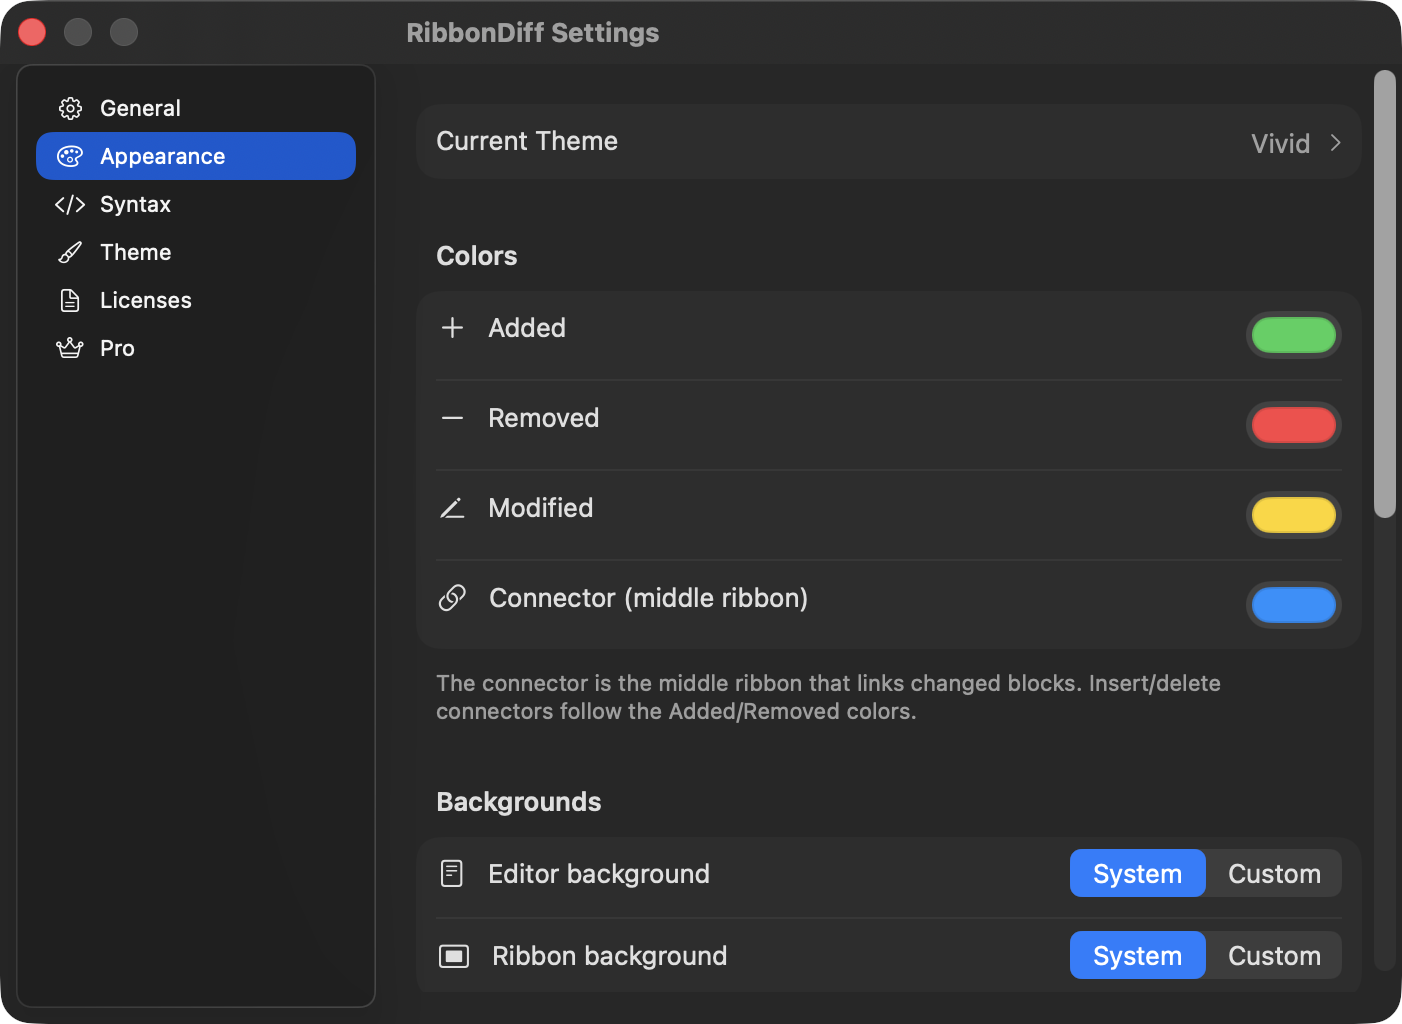
The Appearance pane also shows a Current Theme row at the top. Click it to jump straight to the Theme pane. If your live settings no longer match the selected theme, this row can show a Modified badge.
- Customize diff colors: Added, Removed, Modified, and Connector (middle Ribbon).
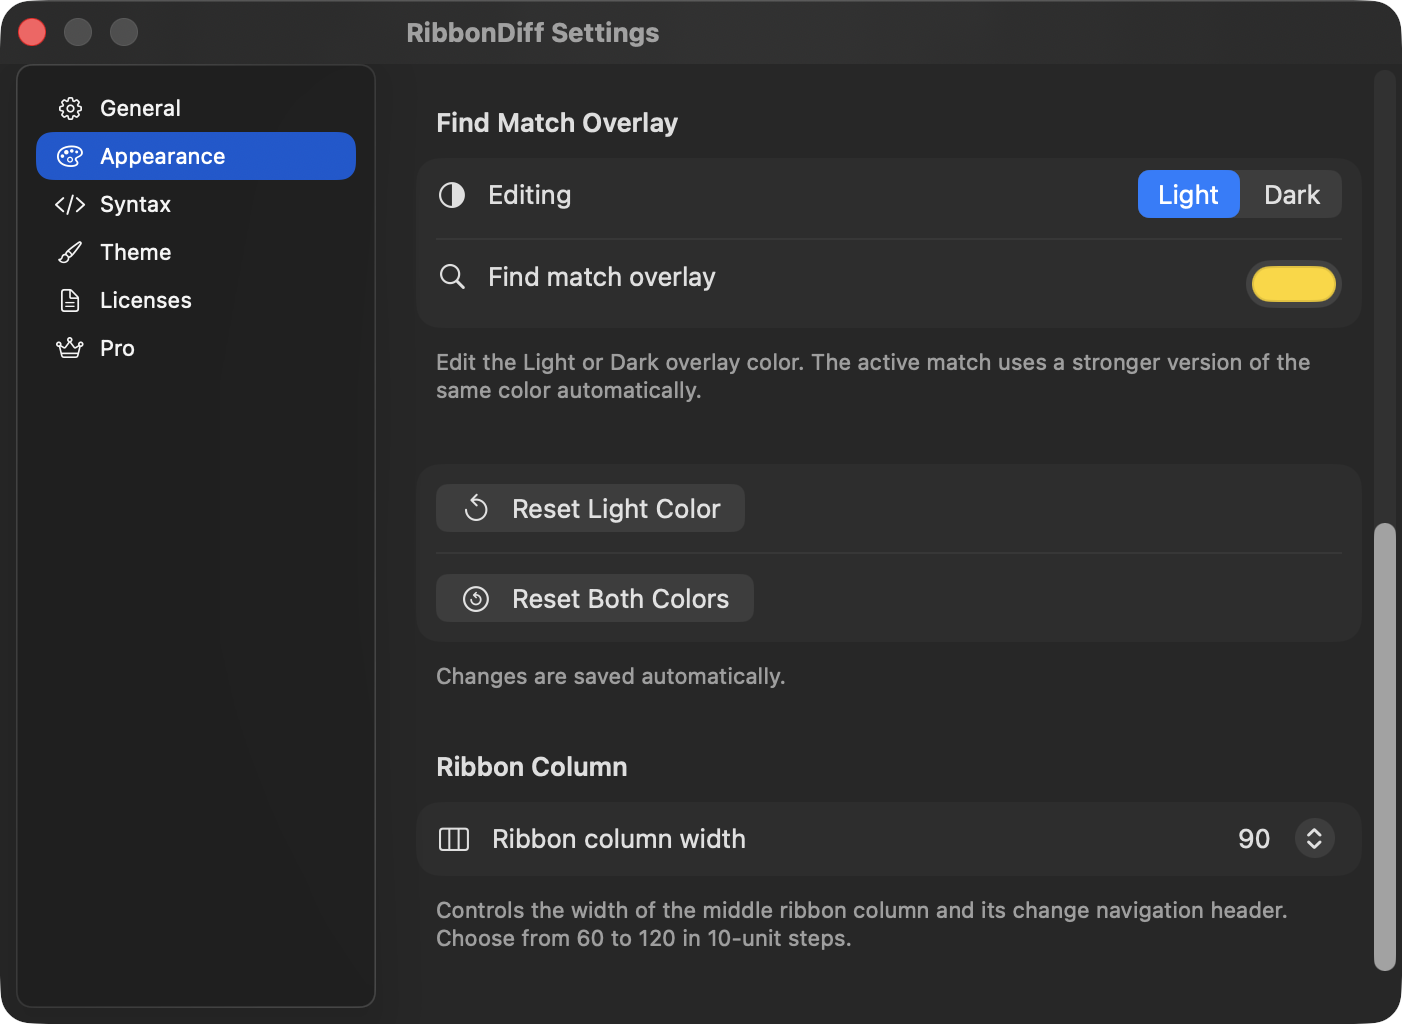
- Edit the Find Match Overlay color separately for Light and Dark appearance, using the same segmented editing style as the Syntax pane.
- The active Find result automatically uses a stronger version of the same overlay color.
- Adjust Ribbon Column width from 60 to 120 in 10-unit steps.
- Choose System or Custom backgrounds for:
- Editor background
- Ribbon background
- When a background is set to Custom, RibbonDiff shows a color picker for that background.
- Use Reset Light Color / Reset Dark Color or Reset Both Colors to restore the built-in Find overlay colors.
System backgrounds automatically follow macOS Light/Dark Mode.
Syntax
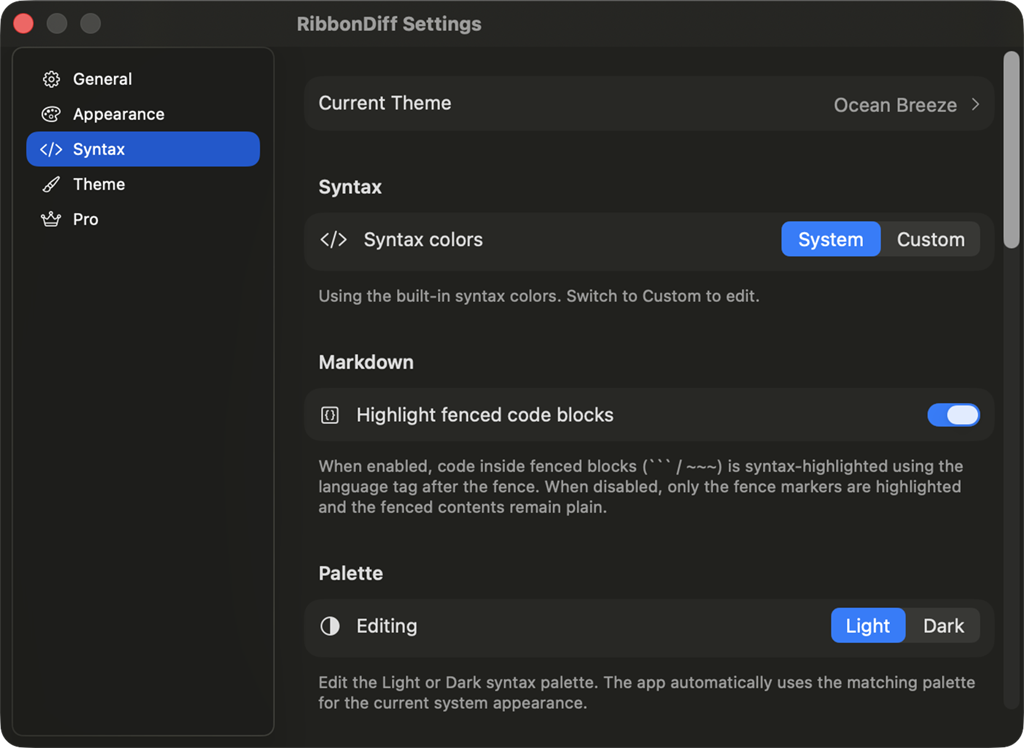
The Syntax pane also shows the current theme at the top so you can jump to the Theme pane while editing colors.
- Use built-in System syntax colors or enable Custom.
- Toggle Highlight fenced code blocks for Markdown.
- Edit separate Light and Dark syntax palettes.
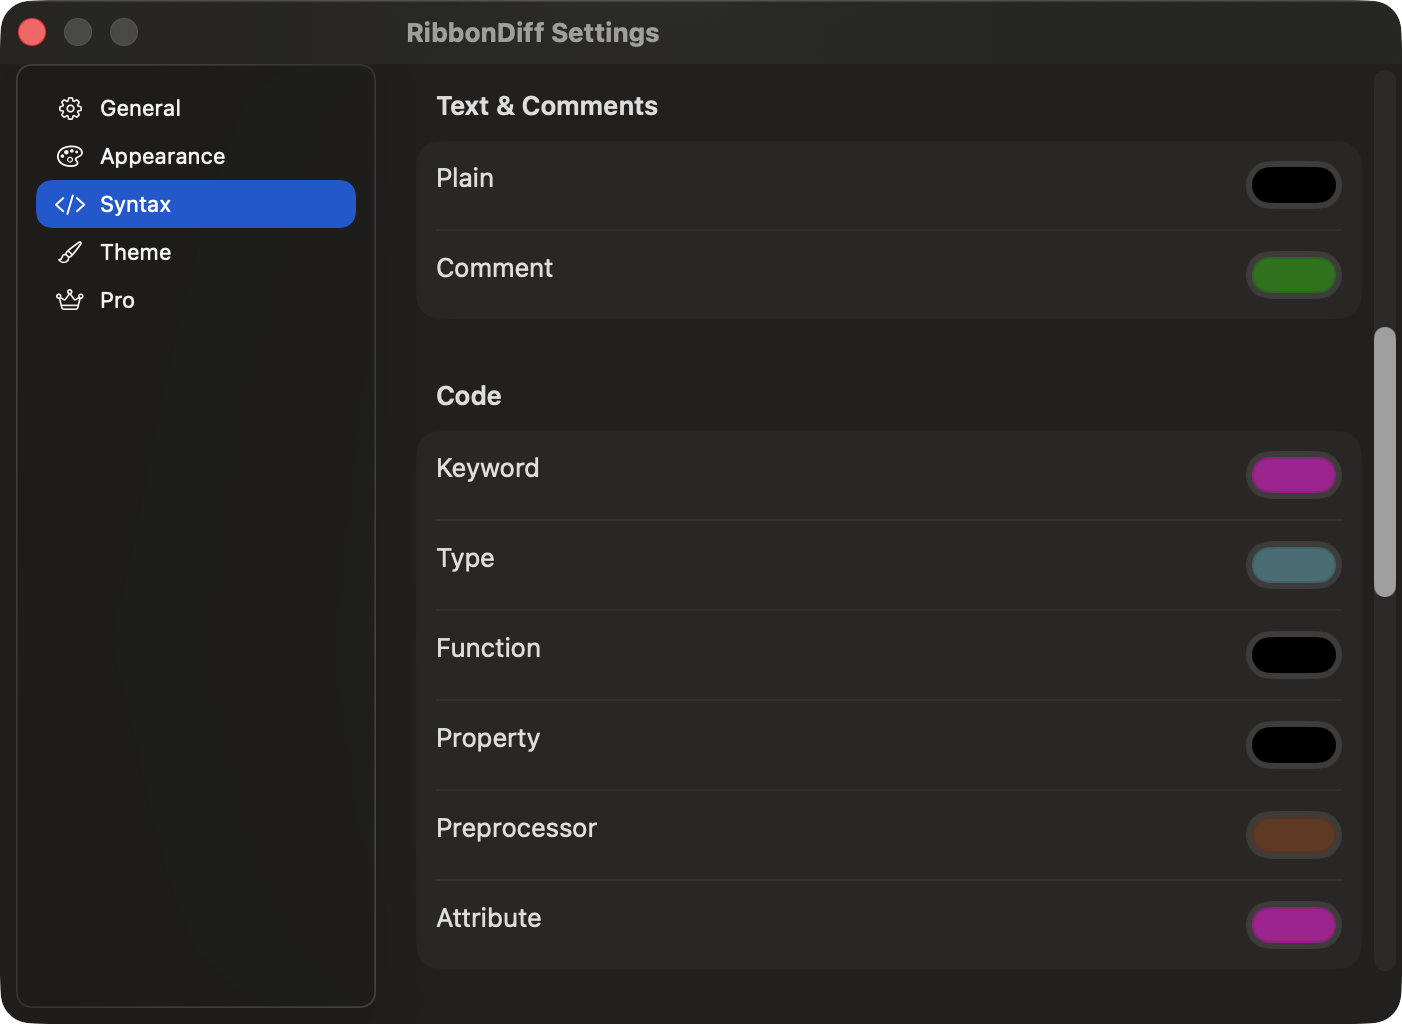
- Customize these syntax color groups:
- Text & Comments: Plain, Comment
- Code: Keyword, Type, Function, Property, Preprocessor, Attribute
- Values: Number, String, String (single quotes), String (backticks), Literal
- Formats: JSON key, XML tag, XML attribute
- Use Reset Light Palette / Reset Dark Palette or Reset Both Palettes to restore built-in syntax colors.
Changes are saved automatically.
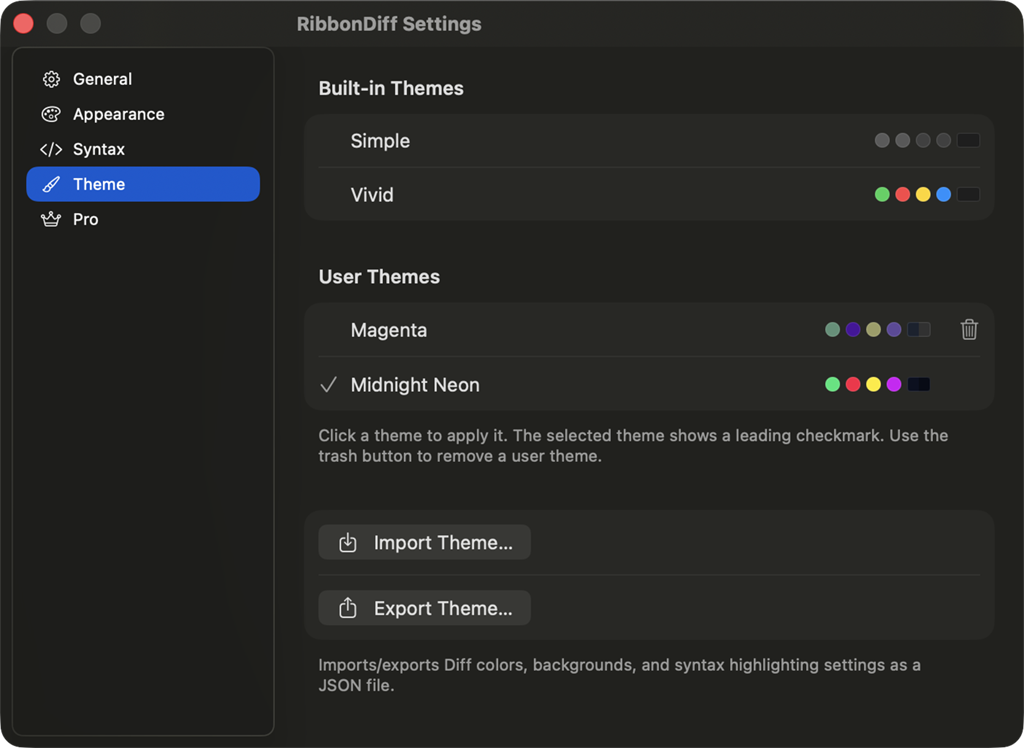
Theme
RibbonDiff supports:
- Built-in themes (Simple and Vivid)
- User themes (created, duplicated, renamed, or imported)
On first launch, RibbonDiff selects the built-in Vivid theme by default. Reset to Defaults also returns to Vivid.
Theme list tips:
- Click a theme to apply it.
- The selected theme shows a leading checkmark.
- A theme row may show a Modified badge if your current colors, backgrounds, find overlay colors, or syntax settings differ from that theme's saved defaults.
- User themes show a trash button for quick removal. The currently selected user theme cannot be removed until you switch to another theme.
Theme actions and context-menu commands can include:
- Revert to Theme Defaults (when the selected theme is modified)
- Save as New Theme… (when the selected theme is modified)
- Save Changes as Defaults (for a modified selected user theme)
- Duplicate…
- Rename… (user themes)
- Remove (user themes)
- Import Theme… and Export Theme…
- Export… from a theme row's context menu to export that theme's saved definition
If you switch to another theme while the current theme has unsaved changes, RibbonDiff asks for confirmation first.
Licenses
- The Licenses pane shows the bundled open-source license texts included with RibbonDiff.
- This pane currently lists the bundled licenses for SwiftGitX and libgit2.
Pro
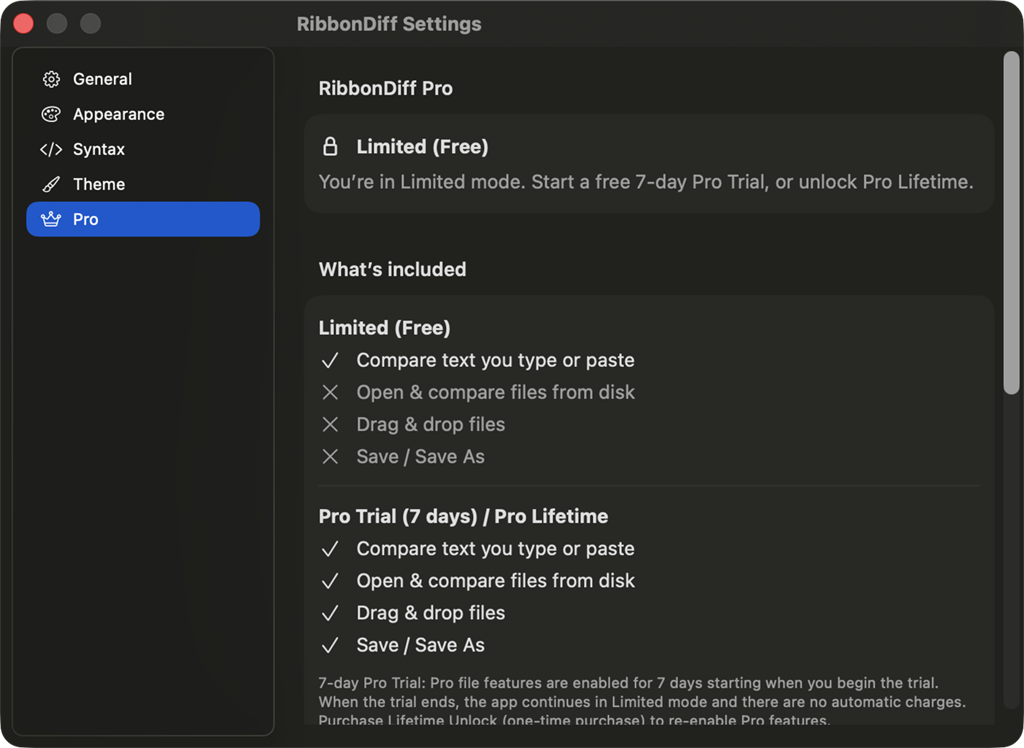
- Shows your access status: Limited (Free), Pro Trial (7 days), or Pro Lifetime.
- Shows a What's included section for Pro features.
- Start the free 7-day Pro Trial (no automatic charges when the trial ends).
- Unlock Pro Lifetime (one-time purchase).
- Restore Purchases if Pro access does not appear (for example after reinstalling or switching Macs).
- If you try a Pro-only workflow such as opening or saving files, using Workspace or Workspace file search, or using Version History in Limited mode, RibbonDiff shows the Pro upgrade prompt.
If you previously purchased RibbonDiff as a paid App Store download, it should automatically unlock Pro Lifetime on the same Apple ID. If it does not, open RibbonDiff → Settings… → Pro and use Restore Purchases.
14. Importing and exporting themes (advanced)
Themes can be imported/exported as JSON.
Import a theme
- Open Settings → Theme
- Click Import Theme…
- Choose a theme
.jsonfile
The imported theme is added to User Themes and applied.
Export a theme
- Open Settings → Theme
- Click Export Theme…
- Enter a theme name (stored in the JSON as
Name) - Choose a save location
The Export button saves the current theme's settings to a JSON file.
The exported JSON includes:
- Diff colors, backgrounds, and Find Match Overlay colors
- Syntax palette(s) and Markdown options
15. Keyboard shortcuts reference
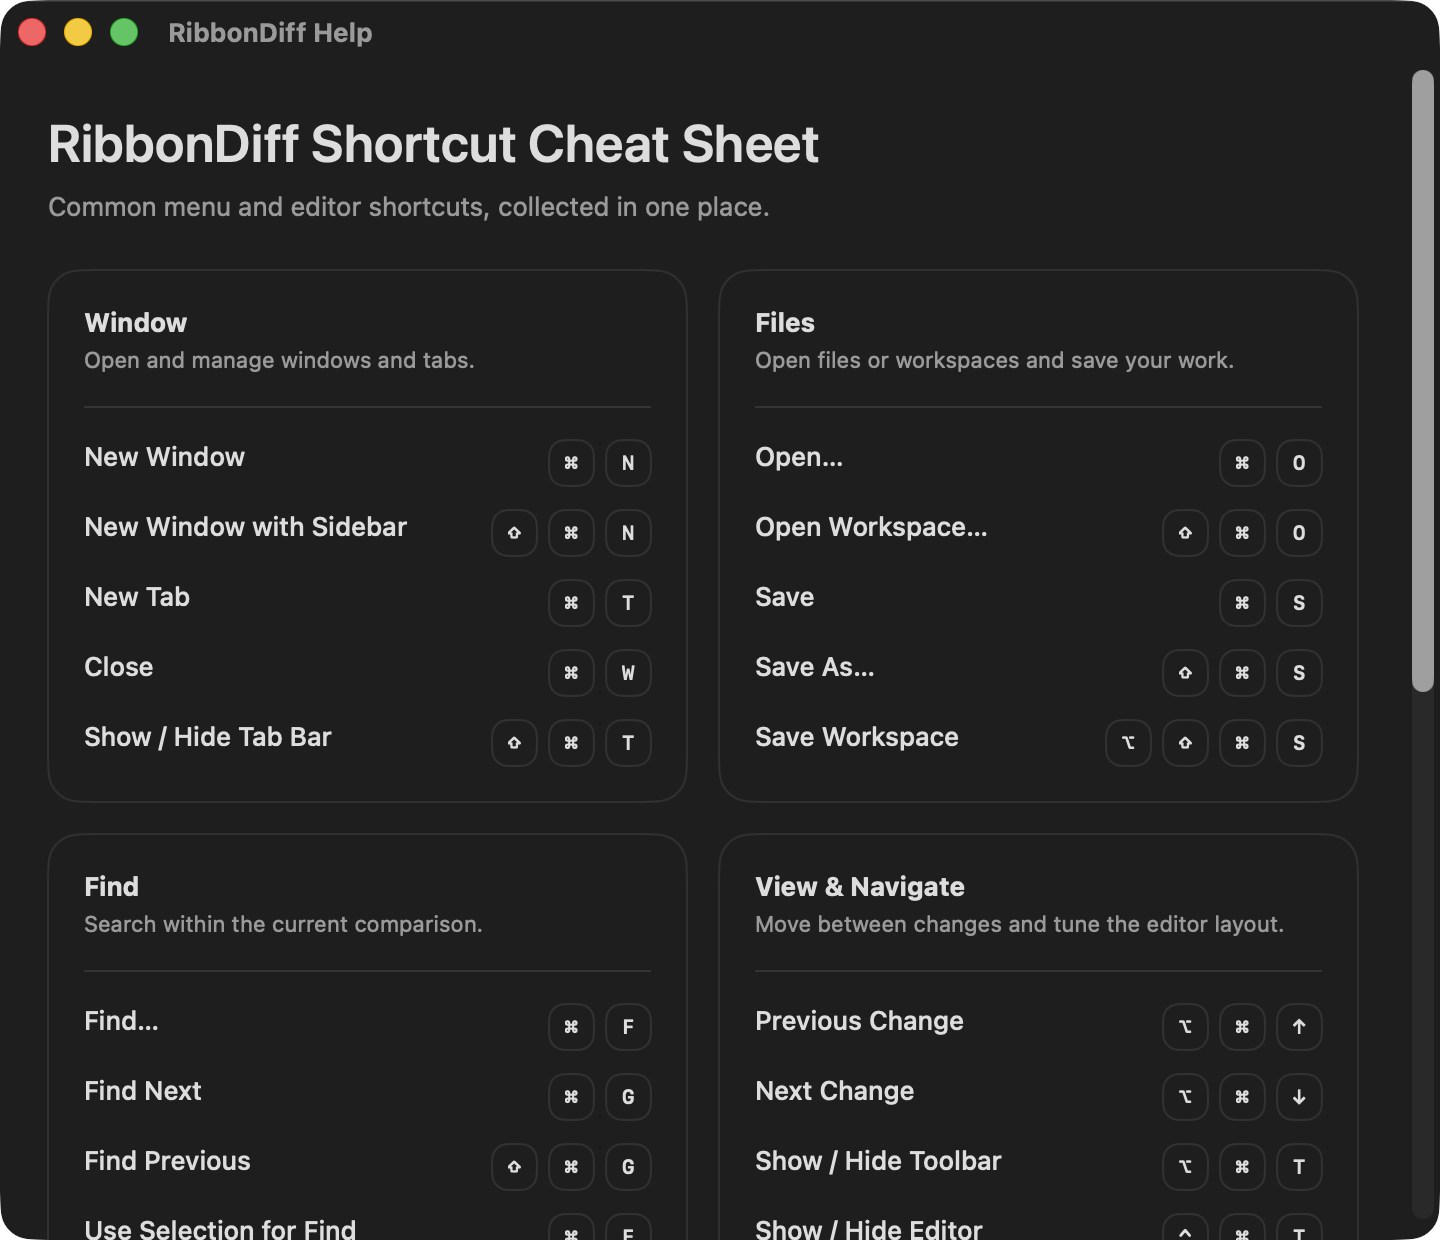
Choose Help → RibbonDiff Help (⌘?) to open the built-in shortcut cheat sheet window, which groups common Window, Files, Find, View & Navigate, and Editor shortcuts in one place.
| Action | Shortcut | Notes |
|---|---|---|
| New Window | ⌘N |
File menu; opens a new standalone comparison window with the Workspace sidebar closed |
| New Window with Sidebar | ⇧⌘N |
File menu; opens a new standalone comparison window with the Workspace sidebar open |
| New Tab | ⌘T |
Creates a new tabbed comparison window |
| Open… 👑 | ⌘O |
Opens into the active pane; Pro-only |
| Open Workspace… 👑 | ⇧⌘O |
Opens the Workspace document picker for a folder or .rd-workspace document in a new window; Pro-only |
| Save 👑 | ⌘S |
Saves the active pane |
| Save As… 👑 | ⇧⌘S |
Saves the active pane to a new file |
| Save Workspace / Save Workspace As… 👑 | ⇧⌥⌘S |
File menu; saves a folder-backed workspace, or creates another .rd-workspace document when one is already open |
| Close Window/Tab | ⌘W |
Prompts if there are unsaved changes |
| RibbonDiff Help | ⌘? |
Help menu; opens the shortcut cheat sheet window |
| Increase Text Size | ⌘= |
Increases the shared editor text size for both panes (same key as ⌘+ on many keyboards) |
| Decrease Text Size | ⌘- |
Decreases the shared editor text size for both panes |
| Reset Text Size | ⌘0 |
Resets the shared editor text size |
| Find… | ⌘F |
Focuses the active pane's Find field |
| Find Next | ⌘G |
Active pane |
| Find Previous | ⇧⌘G |
Active pane |
| Use Selection for Find | ⌘E |
Copies the selected text from the active editor into the active pane's Find field |
| Find in Workspace… 👑 | ⇧⌘F |
Find menu; opens Workspace file search and focuses the search field |
| Indent | Tab |
Indents the current line or selected lines; with no line selection, inserts one indent level |
| Outdent | Shift-Tab |
Outdents the current line or selected lines |
| Indent Selection | ⌘] |
Indents the current line or selected lines |
| Outdent Selection | ⌘[ |
Outdents the current line or selected lines |
| Previous Change | ⌥⌘↑ |
Jump to the previous changed block (active pane) |
| Next Change | ⌥⌘↓ |
Jump to the next changed block (active pane) |
| Show/Hide Toolbar | ⌥⌘T |
View menu; toggles the top controls row (Wrap, Whitespace, Swap, Clear) and remembers the setting across launches |
| Show/Hide Editor Title Bar | ⌃⌘T |
View menu; toggles the pane-header row that contains titles, Find, badges, reload, and clear controls |
| Show/Hide Tab Bar | ⇧⌘T |
File menu; toggles the native macOS tab strip. The shortcut may not always be shown next to the menu item, but it still works. |
| Show File Tree 👑 | ⌘1 |
View menu; switches the Workspace sidebar to the file tree |
| Show File Search 👑 | ⌘2 |
View menu; switches the Workspace sidebar to file search |
| Toggle Wrap | ⌃⌘W |
View menu, window-local |
| Toggle Whitespace Filters | ⌃⌘I |
View menu; turns Ignore indentation style, Ignore leading whitespace, and Ignore trailing whitespace on or off together |
| Swap Panes | ⌃⌘S |
View menu; swaps both panes and their file bindings |
| Clear Both Panes | ⌃⌘K |
Edit menu; clears both panes |
Tip: Pressing Return in an editor continues the current line's indentation automatically. Open Workspace… (⇧⌘O) opens a workspace in a new window; use the sidebar button or drop target when you want to bind a workspace to the current window instead.
16. Troubleshooting
“Can't open file”
Common reasons:
- Opening files is a Pro workflow. In Limited mode, RibbonDiff shows the Pro prompt instead.
- The target pane already contains text.
- The target pane already has an opened file with unsaved edits.
Fix:
- If RibbonDiff shows the upgrade prompt, check RibbonDiff → Settings… → Pro.
- Use the pane's trash / × control to clear it, or open the file in the other pane.
Workspace button stays collapsed or shows an upgrade prompt
- Workspace is a Pro feature.
- If RibbonDiff shows the Pro prompt, start a Pro Trial or unlock Pro Lifetime from RibbonDiff → Settings… → Pro.
- If Workspace is already open in the current window, use that shared sidebar rather than trying to create a separate Workspace per tab.
Workspace file search has no results
- Workspace file search requires an open Workspace and Pro Trial or Pro Lifetime.
- Search covers readable text files in the Workspace. Binary, unreadable, or very large files may be skipped.
- If you just edited a file, save it and run the search again so the saved text can appear in Workspace results.
Version History is not available
- Version History is a Pro-only Workspace feature.
- It works only for files inside a Git-backed Workspace. If the current file is outside the Workspace, or the Workspace is not backed by Git, branch and version selectors may not appear.
- Historical previews are read-only; switch back to the live file if you need to edit.
A file changed on disk
- RibbonDiff now reloads changed files automatically when there are no unsaved edits in the app.
- If you do have unsaved edits, confirm the prompt before allowing RibbonDiff to replace them with the new on-disk contents.
Opening from Finder/Terminal created a new tab
When you open files from Finder (double-click / Open With…) or from Terminal (open -a RibbonDiff …), RibbonDiff protects your current comparison.
- If the frontmost tab already has content, file(s) open, or unsaved edits, RibbonDiff opens the new files in a new tab (or a new window if needed).
- If the frontmost tab is a fresh tab (both panes are blank and not currently opened from a file), RibbonDiff reuses it.
- If you want RibbonDiff to reuse the current tab, make sure both panes are blank and unbound (not opened from a file) — use the pane's trash / × control to clear/unbind (or use a CLI “reuse” option if your workflow supports it).
Workspace file management did not complete
- New or renamed Workspace item names cannot be empty, contain
/, or duplicate another item in the same folder. - Drag moves must target a folder inside the workspace. RibbonDiff blocks no-op moves, moves into the item itself or a descendant folder, and duplicate-name conflicts.
- Delete sends confirmed items to the Trash, so use Finder's Trash if you need to recover something after deleting it.
Open Workspace… opened a new window
- This is expected: File → Open Workspace… always opens the chosen folder or
.rd-workspacedocument in a new standalone window. - If you want to replace the current window's comparison with a workspace, use the sidebar's Open Folder or Workspace File button or drop a folder /
.rd-workspacefile onto the sidebar instead.
Text looks garbled (wrong encoding)
If a file opens with unreadable characters (mojibake), it was likely decoded with the wrong encoding.
- Enable the Encoding badge in RibbonDiff → Settings… (General).
- In the pane header, click the Reload icon (↻) and choose Reload with Encoding to re-open the file using a different encoding.
- If RibbonDiff shows a Choose Encoding sheet on open, pick the correct encoding to continue.
- Note: Reload re-reads from disk and discards unsaved edits in that pane.
Find field or pane badges disappeared
The editor title bar may be hidden.
- Choose View → Show Editor Title Bar, or press
⌃⌘T. - Pressing
⌘Falso reveals the title bar automatically so the active pane's Find field can take focus.
Wrap / Whitespace / Swap / Clear disappeared
The top toolbar row may be hidden.
- Choose View → Show Toolbar, or press
⌥⌘T. - This restores the top toolbar row, including Wrap, Whitespace, Swap, and Clear; your editor content, Workspace, and diff are unchanged.
⇧⌘T works, but the File menu does not show the shortcut
- On some macOS versions, the File menu can omit the displayed shortcut for Hide Tab Bar / Show Tab Bar even though
⇧⌘Tstill toggles the native tab bar. - This affects how the shortcut is shown in the menu, not whether RibbonDiff supports it.
“Theme Import Failed”
- The selected JSON file may not match RibbonDiff's theme format, or may be malformed.
Syntax highlighting looks disabled
RibbonDiff may skip syntax highlighting for very large texts to keep editing responsive.
17. Access levels (Limited and Pro)
RibbonDiff is free to download and use in Limited mode for comparing typed or pasted text. Opening or saving files, using Workspace and Workspace file search, and using Version History are Pro workflows. Because Version History is available only within Workspace, it is also Pro-only.
| Feature | Limited (Free) | Pro Trial (7 days) | Pro Lifetime |
|---|---|---|---|
| Compare typed / pasted text | ✅ | ✅ | ✅ |
Save pane contents to disk (⌘S / ⇧⌘S) |
❌ | ✅ | ✅ |
| Restore Purchases | ✅ | ✅ | ✅ |
| Open files (File → Open…, drag & drop, Finder, Terminal) | ❌ | ✅ | ✅ |
| Workspace sidebar and file search; open/save Workspace documents | ❌ | ✅ | ✅ |
| Version History for Git-backed Workspace files | ❌ | ✅ | ✅ |
In Limited mode: if you try to open or save files, open or save a Workspace, use Workspace file search, or use Version History, RibbonDiff shows the Pro prompt.
7-day Pro Trial: the trial starts when you tap Start 7-Day Pro Trial and lasts 7 days. It does not auto-renew. When it ends, RibbonDiff returns to Limited mode unless you unlock Pro Lifetime.
Start the Pro Trial
- Open RibbonDiff → Settings… and select Pro.
- Click Start 7-Day Pro Trial.
Unlock Pro Lifetime
Open RibbonDiff → Settings… → Pro and click Unlock Pro Lifetime. This is a one-time purchase tied to your Apple ID.
Restore purchases
If you previously purchased Pro Lifetime (or bought RibbonDiff when it was a paid App Store app), restore access from Settings → Pro → Restore Purchases. Make sure you are signed into the same Apple ID that made the original purchase.
Legacy paid customers
If you purchased RibbonDiff when it was a paid App Store download, the app automatically migrates you to Pro Lifetime on the same Apple ID. If it does not show as unlocked right away, use Restore Purchases.